|
Achieving accurate focus is critical to taking good CCD images.
There are several different approaches you can use which can achieve an accurate focus
in just a few minutes. As the temperature drops during the night
the focus position of the telescope will also shift as the metal in the OTA
contracts. This means its important to focus your telescope at regular
intervals to ensure good images. The rate at which you need to refocus
will depend on the design of the OTA and its coefficient of expansion.
I usually refocus every hour.
Using a Hartman Mask
-
Centre the camera on a bright star as described in Finding and
Centering an Object
-
Adjust the telescope focus until the star is well
focused in the flip mirror eyepiece. The telescope should now be close to the
camera focus as the flip mirror finder is designed so that the eyepiece and camera are
close to being par focal.
-
Rotate the flip finder mirror to the horizontal position.
-
Use the camera to take a few second exposure of the star. If the image shows a
doughnut shaped ring of light then make a small adjustment to the focus and take another
image. If the doughnut gets bigger, adjust the focus knob the other way and take
another image. Repeat making small adjustments to the focus and taking new images
until the doughnut has resolved itself into a solid white circle.
-
At this point you could simply keep on making small focus adjustments and taking new
images until the star was small, round and looked focused. However, there is a
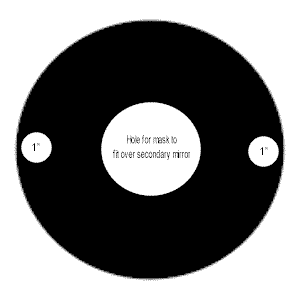
simple way to get a more accurate focus. Make yourself a Hartman mask.

This is simply a circular piece of cardboard cut to fit over the corrector plate of
your SCT or objective lens of your refractor. It has two 1 inch diameter holes cut out of it that are opposite each
other and as close to the edge of the corrector plate as possible. Place this card
over the corrector plate and take another image of the bright star. If the camera is
accurately focused you will see one image of the star. If the camera is not quite
focused yet you will see two images of the star. The further the images are apart,
the more out of focus the camera is. To achieve perfect focus simply make
small adjustments to the focus and take new images until the two star images converge into
one.
-
Now that the camera is focused, rotate the flip finder mirror to the 45 degree angle
and adjust the position of the eyepiece in the finder until a crisp image of the bright
star appears. The finder eyepiece is now truly parfocal with the camera and can now
be used to find and centre objects for imaging.
Using Full Width Half Maximum with MaximDL
Use steps 1-4 of the Hartman Mask technique to get to an
approximate focus. Take an image of a 3-4th magnitude star and select
a small sub frame around it. This will allow subsequent images of the
star to be downloaded very quickly. Enable the continuous focus mode
in the camera control window and observe the FWHM reading from each image
that is downloaded. Move the focus in an out as required until the
FWHM number is the lowest you can make it. It's a good idea to observe
the FWHM for several images between moves of the focuser to let the mount
settle and show you the effect of seeing on the FWHM.
Using Robofocus and FocusMax
If you have an electric focuser such as a
Robofocus you can you the free
FocusMax
software to automate your focusing. It doesn't get any easier or more
accurate than this! |

